All Things Simple
“simplicity is the ultimate sophistication.” Leonardo da Vinci
“simplicity is the ultimate sophistication.” Leonardo da Vinci


Thursday, June 7, 2012
Mermaid Fin Cupcake
I found this adorable cupcake idea on pinterest and it was perfect for my little mermaid. I used candy melt and wax paper to make the fin. Melted pink and blue candy melts in the microwave added a little green food coloring to blue to make it the perfect color. Then I drew a pattern of the fin on wax paper. Put the chocolate on the pattern sprinkled it so it was sparkly. Put it in the fridge to harden and wala mermaid tails! Swirled some blue buttercream frosting on to make it look like water and plopped the mermaid tail in. The little mermaid and her whole class were delighted!
Mermaid Towel Tails
Mermaid tail coverup made from a simple towel, ribbon, and elastic. Email me if you don't feel like making your own and I'll make one for you.They'll be the cutest mermaid at the pool this summer!
Saturday, May 7, 2011
Storage Cabinet
My Kitchen lacks cabinet space, or I just have to much junk.... Anyways I'm always cramming stuff in cabinets and drawers until they are totally full, Soooo last summer while yard selling I came across this cabinet, it was kinda plain but I saw storage potential and also knew with a little paint it could look a lot better (did I mention it was also only $5.00) yeah!!!
(Here is what it originally looked like before I painted it and added chicken wire to the door fronts).
The first thing I had to do was remove the inner panels on the doors. I drilled a small hole in the door and used a jigsaw to cut the panels out.
After the doors were cut, I removed the doors and painted them and the cabinet. I then sanded and distressed them.
Next I added chicken wire and burlap to the doors.
I also added a couple of shelves to the cabinet to hold more of my junk. Ha ha!!

Here it is all finished, I love it !!!!!!
Have a great day,
Kari
Tuesday, May 3, 2011
Cupcake Wars
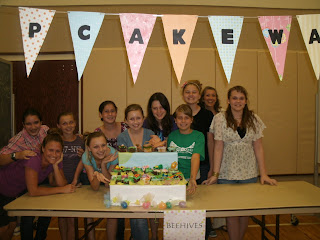
Good Morning! I just wanted to post a super fun Young Women's activity "Cupcake Wars" that we did a couple weeks ago with our YW's group. We have 36 girls and we divided the girls per age group; Beehives, Mia Maids, Laurels. We took the premise from "Cupcake Wars" from Food Network. Since "Cupcake Wars" always has a theme, our theme was "Easter" since Easter was coming up. Each group got the exact same items. 24 cupcakes, cream cheese frosting, buttercream frosting, and fondant. If you have never made your own fondant. It is quite simple and very fun to work with. I always use a Marshmallow fondant recipe and I'll have to post many of our fondant cake creations in another blog. Here's the recipe http://candy.about.com/od/fondantcandyrecipes/r/mm_fondant.htm I always follow the recipe exactly.


We left all the frostings white and each group received 4 food coloring colors, 3 cookie cutters, a couple zip lock bags for piping the frosting, crisco, wax paper & rolling pin to work with the fondant, knives, spoons, and we equally split any topping the girls brought to add on top. (We had asked each girl to bring some type of cupcake toppings) We had m&ms, many different sprinkles, choc, chips, cookie bits, and a couple other candies. We also gave each group items for their displays; 2 cardboard boxes, 4 pieces tissue paper, 4 colors of 4 each tulle circles, 1 pkg of 12 plastic Easter eggs, and 1 piece of wrapping paper. They also all go scissors and tape.
We explained the competition and laid down the rules. No looking at each others design and cupcakes. We had our cupckae wars in the cultural hall and had each team divided by chalk board petitions. The girls then had 45 minutes to create a display design, decorate their cupcakes, and clear up their tables for their displays.
Everyone had so much fun. The girls are all so creative and quite competitive. It was a blast. Many girls kept telling me this was one of their favorite activities ever.
We had the Bishopric come and judge the design and decorations and then everyone got cupcakes for refreshments. Believe me, if you do this for an activity, it's going to be quite a hit!


Tuesday, April 19, 2011
Old Soda Pop Crates
Can I just Say I love these old looking Crates for Decorating!
I think they add just the right touch to any room, and they were easy to make.
Step 1: I used 1x4's and cut 2 boards 10 inches long for the ends and cut 2 boards 18 inches long for the sides. ( You can cut and make these an size you wish).Step 2: I used a staple gun and stapled all four boards together.
Step 3: Now I cut 3 more boards 18 inches long to make 3 slats in the bottom of the crate.
Step 4: I used my router to make handles in the side boards.
Step 5: Choose you paint color and paint, (I used red for this one.)
Step 6: I used a Coca-Cola stencil for this one.... (I love how it turned out)
Step 7: I love the old metal look on Crates, so I went to the plumbing section in Home Depot and bought a role of plumbers tape for $2.50, it was a little shinny so I soaked it over night in salt water. The next morning I nailed it on with roofing nails and smeared a little red paint on it, to make it look older, I sanded and scuffed the crate up to give it that antique look...... LOVE IT!!!!!!
AHHHHH
Step 8: I liked it so much I made a couple more!!!!!!!
Tuesday, April 12, 2011
Healthy Breakfast
Good Morning Everyone! So, you all know, or will after this post, that I love to be healthy. I love eating healthy, exercising, and taking care of all aspects of my life. I'm sure many of you have heard that breakfast is the most important meal of the day, and I think for many, this is the meal they don't get, or skimp on the most. So, I just wanted to show you how 10 minutes can make you a very healthy and easy breakfast. Here we go. Protein is critical for feeding our muscle. I am making one of may favorite breakfasts. A vegetable and turkey omelet. With this omelet you get your lean protein, vegetables and even a little dairy. First, choose what you want to go in your omelet. I have peppers, tomatoes, and smoked turkey breast, and a little cilantro. (another favorite of mine is tomatoes, onions, spinach and avocado) Chop everything up and your ready.
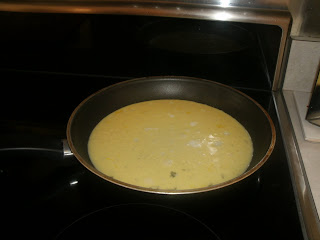
I use two eggs when making one just for me, one whole egg and one egg white. Crack them into a dish and then add about 2 Tbls milk and some salt and pepper to taste. Whisk it up well and pour in a greased skillet.
I always heat my pan up about 30 seconds before I add my egg mixture. Cook on medium low to medium heat until the egg mixture is no longer runny (maybe a minute or so), then add all your filling. Put most on one side of the egg.
Don't worry if it kind of falls apart, it will still taste the same. Now, I just let this melt the cheese about another 30 seconds and Walla, that's it. You're ready to slide it on your plate. (That's what I do is slide it from my skillet to my plate. I sprinkled a little cilantro on the top for color and taste!
I use two eggs when making one just for me, one whole egg and one egg white. Crack them into a dish and then add about 2 Tbls milk and some salt and pepper to taste. Whisk it up well and pour in a greased skillet.
I always heat my pan up about 30 seconds before I add my egg mixture. Cook on medium low to medium heat until the egg mixture is no longer runny (maybe a minute or so), then add all your filling. Put most on one side of the egg.
Cook about 30 seconds and then sprinkle a little lowfat cheese (if desired) I like how it holds everything together.
Now, you are ready to fold half the egg over the rest (fold the side without the filling)
I usually have mine with some fresh fruit or a slice of whole grain toast! Yum! Now go take care of yourself and eat a healthy breakfast!
Kimarie
Monday, April 11, 2011
Easy Wooden Crates
I Love using wooden crates to decorate with!!!
Step one get a crate and choose your paint color (I chose white)....
Step two, after I painted it I sanded and scuffed it up a bit with sand paper, I love the old look so I rubbed a dark walnut stain on the edges...
Now the hard part, deciding where you want to use it!!! I knew exactly where this one was going to go, I've been wanting to hide some t.v. cords.... It worked perfect and I love it there.
I liked it so much I painted one yellow too!!!

I have to admit I bought this one at Micheal's, they were on sale for $3.00 so I figured I'd save the time and just buy it instead of making it...
Step one get a crate and choose your paint color (I chose white)....
Step two, after I painted it I sanded and scuffed it up a bit with sand paper, I love the old look so I rubbed a dark walnut stain on the edges...
Now the hard part, deciding where you want to use it!!! I knew exactly where this one was going to go, I've been wanting to hide some t.v. cords.... It worked perfect and I love it there.
I liked it so much I painted one yellow too!!!

Have a GREAT day!! Kari
Subscribe to:
Posts (Atom)


